Music

แสดงบทความที่มีป้ายกำกับ MAC แสดงบทความทั้งหมด

วันอังคารที่ 14 มกราคม พ.ศ. 2557

Spring MakeUp

Yesterday, I had a post about the Clothing trend for Spring 2014. Today I'm bringing beauty related topic, Makeup trends for Spring 2014. Enjoy! 


1) Bright bold lipstick- This is the HUGE trend this year on the SS14 Spring/Summer runway shows. FYI: only make your lips the focus point of your face by minimize the amount of colors use in the other parts of your face.                 

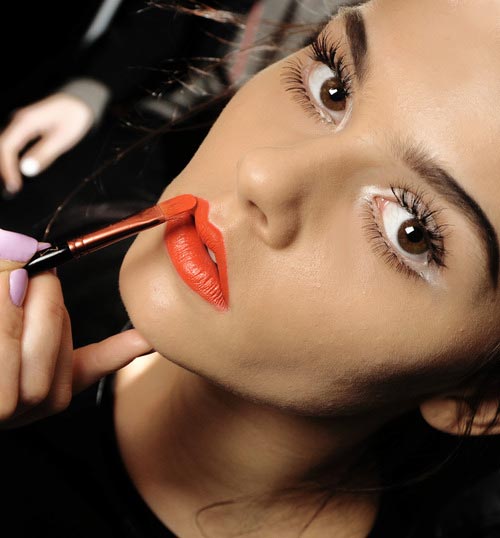
I would recommend MAC lipstick in Morange or Maybelline Vivids lipstick in electric orange.

2) Natural look (Makeup No makeup)- "Less is More" the quote says it all.
Beauty Blender sponge should give you this flawless yet full coverage and non cakey face. Also, apply a thin layer of foundation at a time, it there's not enough coverage then you could go back and apply some more. 

3) White eye shadow or white eyeliner- The white eyeliner brighten the eyes which gives you the youth look.
White eye shadow makeup
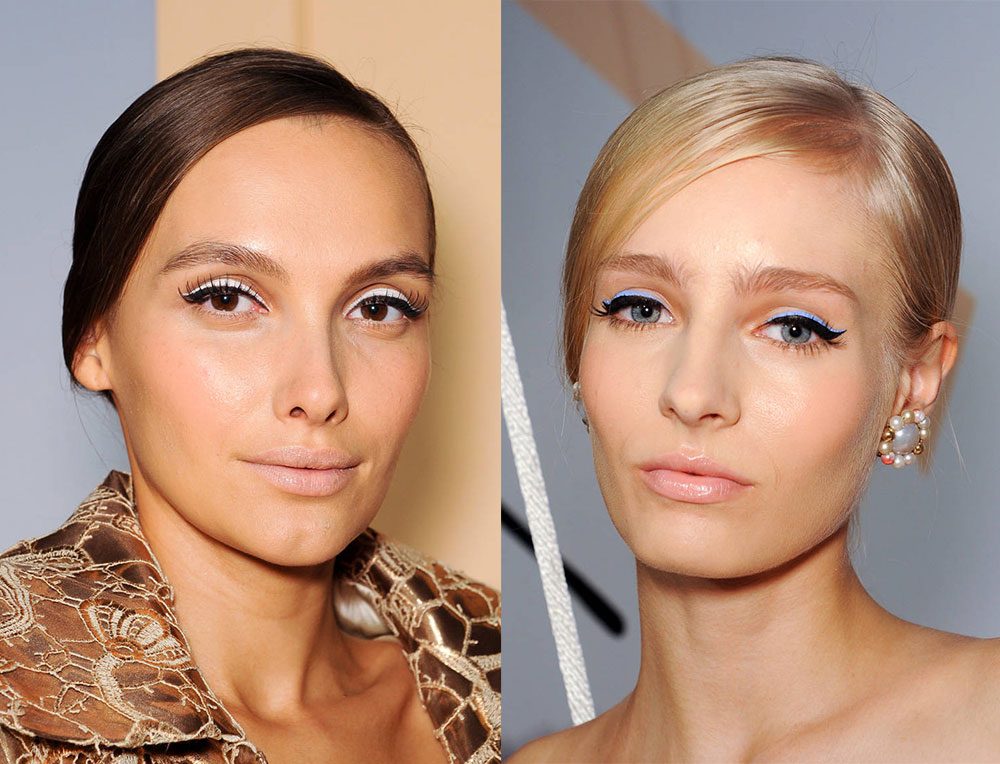
White eyeliner (MAC eye kohl in Fascinating) 

4) Smudgy Eyeliner- Smoking out the eyeliner on the upper and bottom lashes gives you the softer look rather than the precise liner look. 


For this eyeliner look, the more it smudges, the better. So it doesn't matter what eyeliner brand you use, it would work. BUT we beware that you shouldn't use eyeliner that's too hard because it would your eyes and made them aged faster than it should.

5) Pastel Wash of Color- This look would definitely look gorgeous on runway while it would make you look totally wash out if you take this look outside your door. However, if you want a pastel wash of color for you eye look you could probably have it as eyeliner for a playful look ;) 
You just add eyeliners on the upper lashes and mascara and walk out the out the door!

XX,
G.

P.S. See you tomorrow for my 2013 beauty favorites!!!

วันเสาร์ที่ 11 มกราคม พ.ศ. 2557

Sultry Saturday! Makeup routine

Here come the weekend we have all waiting for, and I decided to do something a little different! So I found my make up kit lying around my room so I got an idea to show you guys what I do with my face on the regular bases! SO OFF WE GO!
Products1) CoverGirl Outlast Stay Fabulous 3 in 1- color: 940

2) Maybelline Fit Me concealer- color: 10 Light

3) MAC Mineralize Skin Finish Natural- color: Medium Plus

4) Physician Formula Bronze Booster- color: Medium to Dark

5) Kat Von D Tattoo Liner- color: Trooper (sample size)

6) Maybelline Great Lash- color: Clear

7)Anatasia Brow Powder Duo- color Brunette

8)Milani Baked Blush- color: 03 Berry Amore

9) Estee Lauder Sumptuous Extreme Multiplying Volume Mascara- color: Extreme Black
10) Rimmel London Kate Collection lipstick- color: 110
11) Real Technique Buffing brush
12) Real Technique Contour brush 


Here's the face I started with, so basically my skin is extremely dry due to the consumption of the medication that I'm taking. But before I took the medication, I had combination skin, I usually get oily in my T-zone area with I just bolted it off with tissue paper rather than using an oil absorbing sheets. Also, I have sensitive skin which doesn't allow me to use any produce with fragrance on my face. I suffered from blemishes and acne scars. Now I know the picture doesn't look as bad as it is, but trust me it's way worst in real life.

First thing first, I pumped out my foundation about a pump and a half and dotted around my face and start buffing it with my real technique buffing brush. However, on the area with dry patches (like on the side of my nose and between my brows) I would push the foundation in rather than buffing it because buffing motion would accentuate those dry areas. Then after neutralizing the skin, it's time to conceal those red spots and blemishes on my face, I pushed the product into the skin on all areas (under eyes area, blemishes, redness). 

Next I contoured my face with bronzer and a contour brush, now people might be asking why don't I apply the bronzer after  I put on the powder? Well that's because I like a structured face and if you use a powdery product over the liquid product, the powdery product has more tendency to stick on better to the skin. I just applied it on the hollow of cheeks, temples, top of forehead, and jawlines. Now I locked the products into push with MAC powder, again, pushing it into the skin using a buff, not the face brush because we do not what the foundation and concealer that we already put on our face to move, so the patting motive of the powder also make the makeup last all day!! Then applied the blush on the apples of the cheeks.

Now move on to the eyes, nothing much because I'm not of an eye shadow person. So what I did was a winged out eyeliner. I got the inspiration from the "Pin Up girl" eyeliner look, which is more focus on the outer wings and the eyeliner only end half way to the iris of the eye. Then I just patted some glittery eye shadow. Then on to the lashes, just curl my lashes and pile on the mascara to get the volume and length that you desired (on both top and bottom lashes). Next is the brows, so I just brushed the brows with my spoolie and see if there's any sparse area if so fill it in with a brow shadow and finally set the brow with the clear gel.

Last but not the least, put on some lipstick, Girlfriend!


Here I changed up the lipstick into Revlon "Berry Haute" a more muted purple. 

See you tomorrow,
G.